If you’ve purchased a custom box, you'll receive instructions to begin the design process shortly after your campaign request is approved. This article provides step-by-step instructions on how to collaborate with Bazaarvoice to create and finalize your custom box design and mark your corresponding design tasks as complete.

Before you begin
Ensure you have access to the Bazaarvoice Support Community to complete design tasks. Your required tasks will depend on whether you are using Bazaarvoice’s design services or designing the box yourself. Follow these steps to navigate to your design tasks:
-
Sign in to the Bazaarvoice Portal.
-
Under Help & Support, select Access the Support Community to open the Support Community homepage.
-
Select Projects > Tasks.
-
Update your Recently Viewed drop-down to My Tasks Ready to Start.
Note: Pin this view to set it as your default. -
Select the design task(s) for the relevant Sampling campaign.

Bazaarvoice-designed box
Step 1: Complete the Submit Design Assets task
To begin the design process, provide the following assets for the Bazaarvoice design studio team:
|
Required assets |
Accepted file types |
Rejected file types |
|---|---|---|
|
Brand logo |
EPS or AI (Vector files only) |
PDF, PSD, JPEG, PNG, or rasterized EPS/AI |
Hero image (used on the top panel) Product image (used on the top panel as a hero image or stand alone image) |
JPG, PNG, or PSD with a minimum of 300 PPi to match the size of the panel. Isolated PSD or PNG with a minimum of 300 PPi to match the size of the panel. |
PSD, TIFF, and JPEG that are bigger than 50 MB. 
Any images below 300 PPi will be rejected.
|
|
Brand colors |
Color values in CMYK (Any RGB or PMS colors will be converted to the closest CMYK values without requiring approval) |
RGB, Pantone, or Hex |
|
Brand fonts |
OTF or TTF |
Any other file. |
|
Graphics and patterns |
AI, EPS, SVG, or layered PSD (Please provide packaged AI or layered PSD files to include linked images and fonts) |
Flat PSD, TIFF, or JPEG and PNG with colored background. |
Submitting assets
-
Sign in to Support Community. Select Projects > Tasks to view your assigned tasks.
-
Locate and select the Submit Design Assets task and review the task description for instructions.
-
In the top-right corner of the task, select the hyperlink that starts with MILE- to open the campaign Milestone.
-
Navigate to the Design Info section and then the Client Assets field. This field contains a link to a shared folder.
-
Select the link to access the shared folder and upload all required assets, ensuring they comply with the provided guidelines.
-
Once all assets are uploaded, return to the Submit Design Assets task and mark it as Complete to finalize submission.
Step 2: Complete the Box Artwork Feedback task
The Bazaarvoice design studio will draft their best artwork recommendation for your custom box using the submitted assets. A maximum of two rounds of revisions will be provided to maintain timelines effectively.
Providing feedback to Bazaarvoice
-
Once the first draft is ready, you'll receive an email notification stating that your Box Artwork Feedback task has moved into Ready.
-
After receiving this email notification, sign in to Support Community. Select Projects > Tasks to view your assigned tasks.
-
Locate and select the Box Artwork Feedback task. Review the task description to locate the link to a Google slide presentation containing the proposed design.
-
Select the link to open the file.
-
Add your feedback directly on the dedicated slide of the presentation or add your comments on the design slide using the comment tool.
If multiple teams are involved in approving the artwork, consolidate feedback before adding it to the slide. -
Once feedback is added, complete the Box Artwork Feedback task in Support Community:
-
Sign in to Support Community. Select Projects > Tasks to access your assigned tasks.
-
Select the Box Artwork Feedback task and mark it as Complete.
-
The Bazaarvoice design studio will apply the requested edits and create a second draft. If additional changes are needed, Bazaarvoice will notify you to repeat the above steps.
Once the box artwork is approved, move to the final step in the design process to initiate printing.
Step 3: Complete Final Box Artwork Approved task
Once artwork is approved, Bazaarvoice will coordinate with the warehouse to initiate printing.
Sign in to Support Community. Select Projects > Tasks to access your assigned tasks.
Select the Final Box Artwork Approved task and mark it as Complete. This will notify Bazaarvoice that your files are ready for printing.
Client-designed box
Step 1: Retrieve assets
To get started on the design process, you must obtain the appropriate box die-line and Influenster assets. Die-lines are dependent on both the dimensions of SKUs sampled and the warehouse responsible for printing.
Sign in to Support Community. Select Projects > Tasks to access your assigned tasks.
Locate and select the Submit Design Assets task.
In the top-right corner of the task, select the hyperlink that starts with MILE- to open the campaign Milestone.
Navigate to the Design Info section and find the Client Assets field. This field contains a link to a shared folder.
Select the link to access the shared folder and download the appropriate box die-line and all Influenster assets.
Step 2: Create box artwork
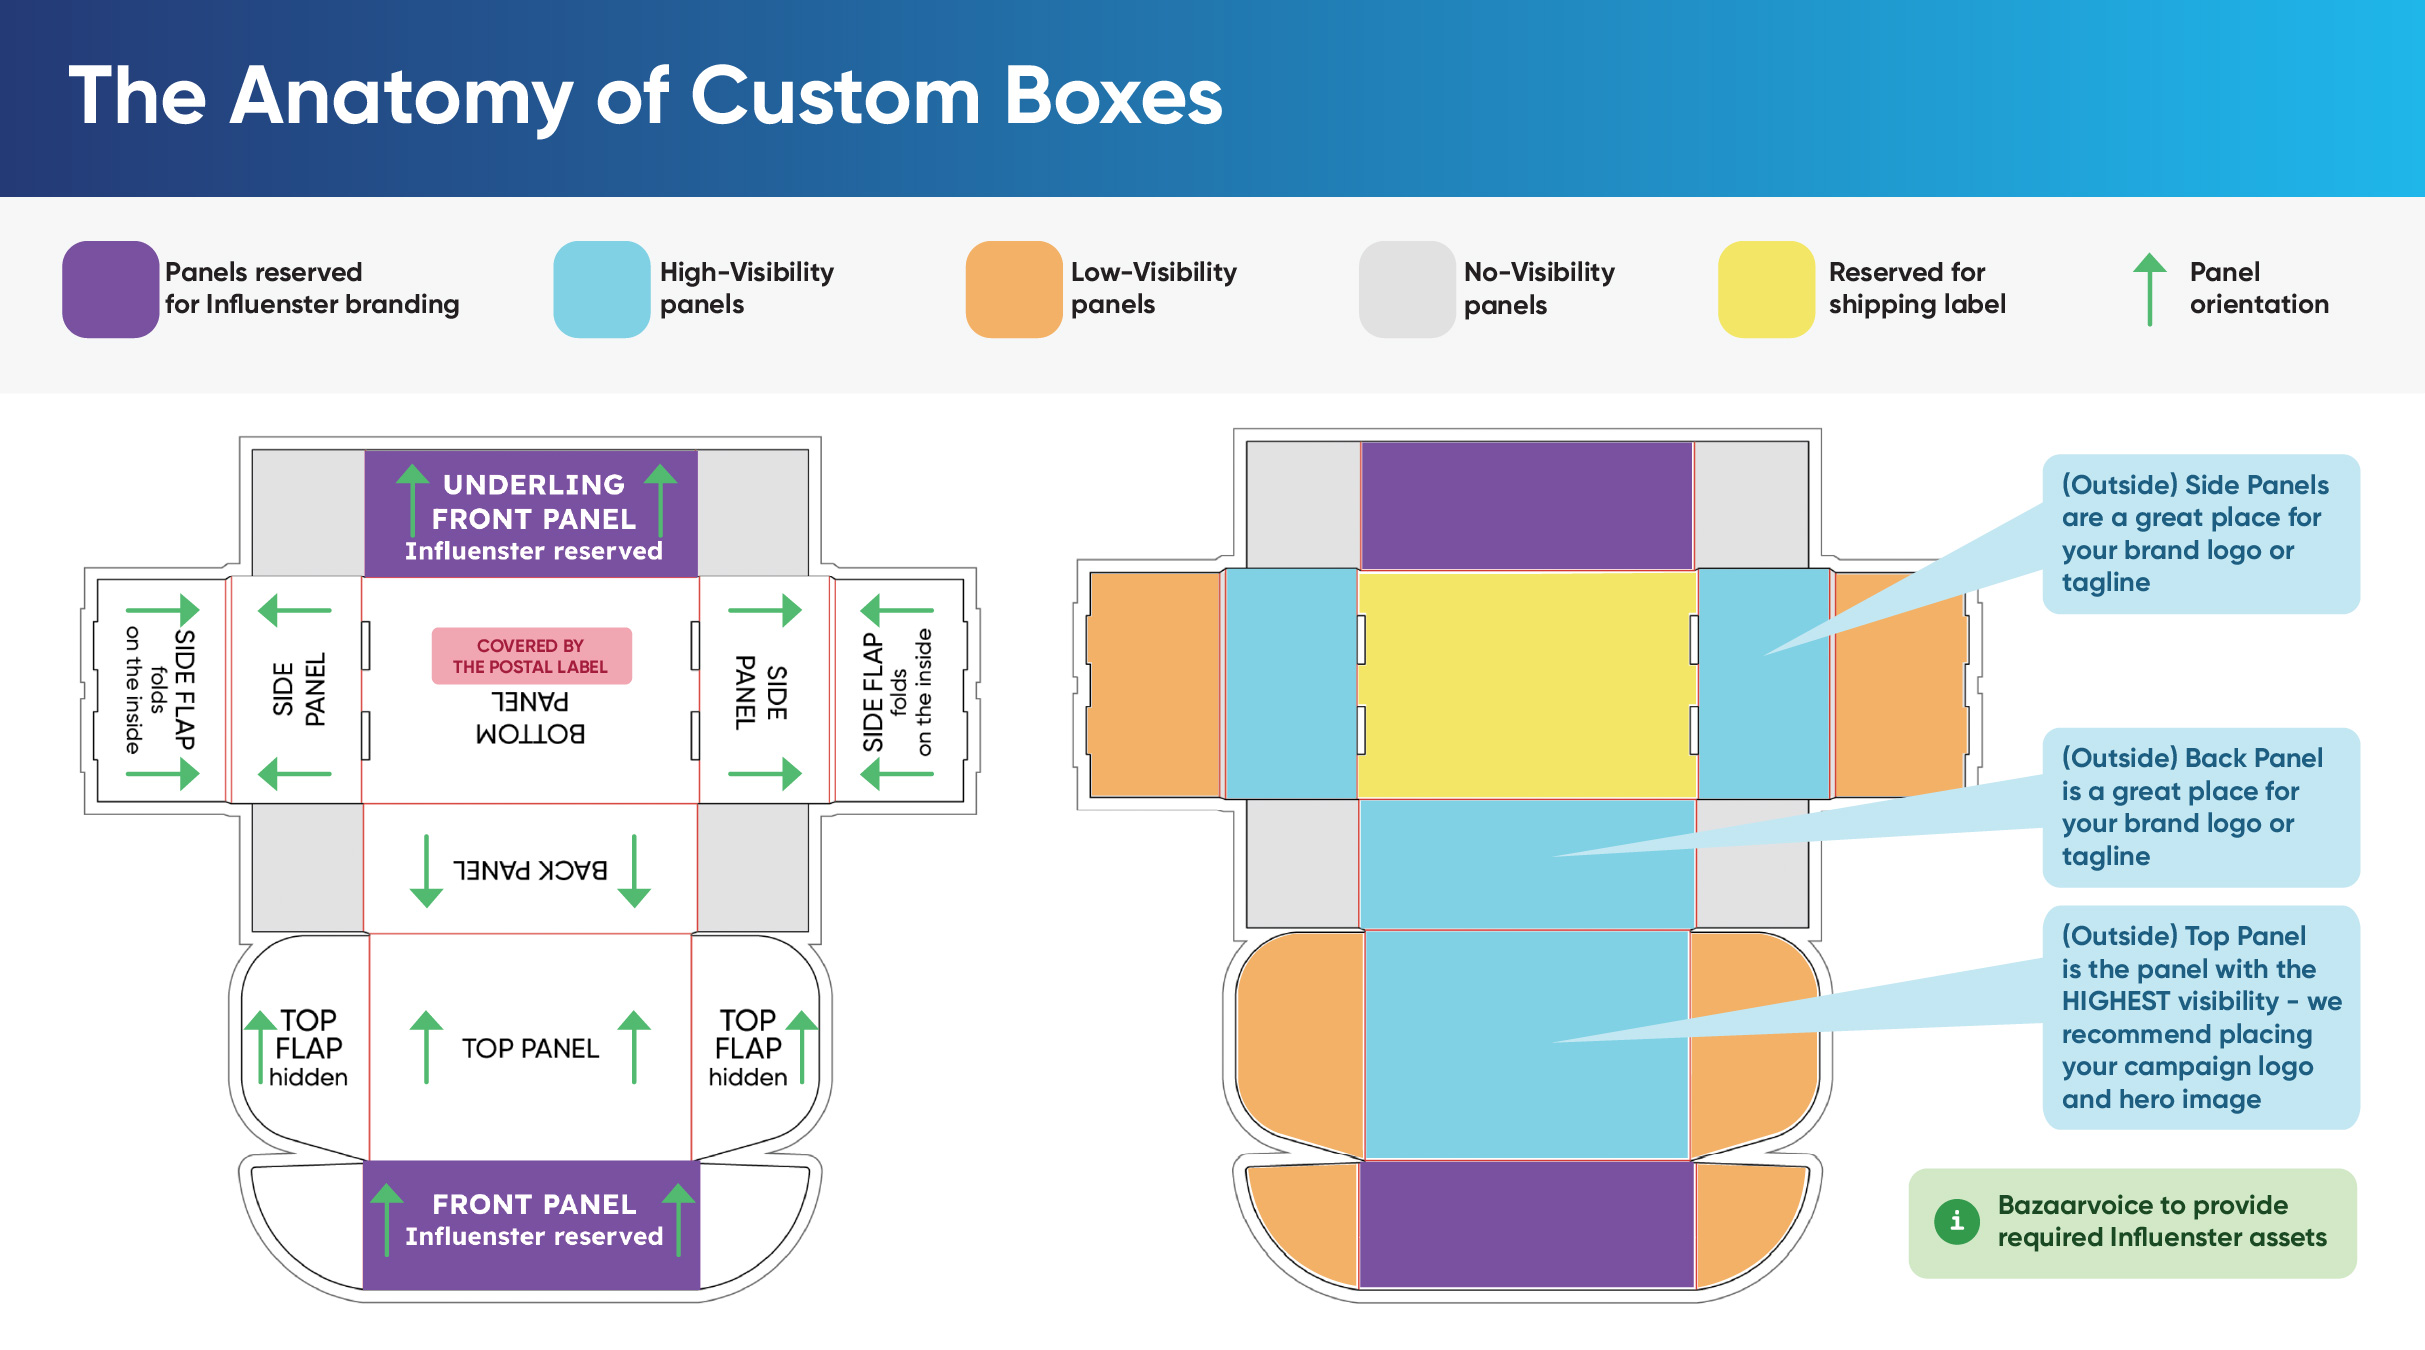
When creating your custom box artwork, you must follow Bazaarvoice’s guidelines for designing and preparing your files. Failure to do so may slow down your campaign progress. Refer to the image below for design requirements:
| Do | Don't |
|---|---|
| All designs must be created using Adobe Illustrator. AI files are the only file types accepted. | Don't design your custom box using any software outside of Adobe Illustrator. |
| Package your file with all images and fonts properly linked. | Don’t send AI files that aren’t packaged because all the links and fonts will be missing. |
| Follow the Anatomy of Custom Boxes guidelines to ensure Bazaarvoice requirements are met. | Don’t deviate from the Anatomy of Custom Boxes guidelines. |
Make sure designs are placed on a separate layer from the die-line. (Keep die-line layer locked at all times) | Don't rotate die-lines, stretch the artboard, or apply your designs on the same layer as the die-line. Any changes to the die-line will result in file rejection. |
| All included images and graphics must be at 300 dpi and set as CMYK color profile. | Don’t use images that are less than 300 PPi scaled to the actual panel size where they are going to be placed. |
| Keep your final Adobe Illustrator packaged file size under 300 MB and your file name under 50 characters. Convert large TIFF and PSB files into JPG or PNG to keep the total file size under 300 MB. | Don't let your final file size exceed 300MB. |
Step 3: Complete the Submit Design Assets task
When your custom box artwork has been finalized, Bazaarvoice will work with your assigned warehouse to initiate printing. To submit your final artwork and begin the printing process, complete the following actions:
Sign in to Support Community. Select Projects > Tasks to access your assigned tasks.
Locate and select the Submit Design Assets task.
In the top-right corner of the task, select the hyperlink that starts with MILE- to open the campaign Milestone.
Navigate to the Design Info section and find the Client Assets field. This field contains a link to a shared folder.
Select the link to access the shared folder and upload your packaged artwork.
Once your artwork has been uploaded, return to the Submit Design Assets task.
Mark the task as Complete to notify Bazaarvoice that your files are ready for printing.
What's next?
After boxes are submitted for printing, Bazaarvoice will work on configuring your campaign and solidifying member selection while you prepare inventory.
You've completed the Design a custom box step.
You’ve completed Step 3: Complete and track campaign tasks.
You can now move onto the Step 4: Fulfill your Sampling campaign.