Complete the steps below to connect Adobe Analytics with the Bazaarvoice Portal. This integration automatically sends transaction data from your checkout or transaction page to Bazaarvoice, allowing you to track revenue, conversion volume, and key ROI metrics for your Ratings & Reviews solution within the Bazaarvoice Portal.

Required solutions and roles
You must have:
| Solutions | Roles |
|---|---|
|
|

Step 1: Create developer project and credentials in Adobe
Before you connect Adobe Analytics to the Bazaarvoice Portal, you must set up your developer project and credentials in the Adobe Developer Console.
Follow these steps to complete this setup:
- In the Adobe Developer Console, select Projects in the top-left corner.
- Select the Create new project button in the upper-right corner of the Projects page.
- Select the Edit project button in the upper-right corner of the projects page.
- Enter "Bazaarvoice Ratings & Reviews Connection" in the Project Title text field.
- Select Save.
- Select the Add API button in the middle of the page under Get started with your new project.
- Select Adobe Analytics.
- Select Next.
- Make sure that Server-to-Server is selected. This is the default. Select Next.
- Make sure that OAuth Server-to-Server is selected. Select Next.
- Enter "Bazaarvoice Ratings & Reviews Credential" in the Credential name text field. Select Next.
-
Select the product profile that has access to your desired report suite ID. The report suite ID should match the one that's on your site.
- You can find your product profiles in the Adobe Admin Console (Products > Adobe Analytics).
- Select Save configured API.
Step 2: Configure Adobe Analytics settings in Bazaarvoice Portal
To set up and enable Adobe Analytics integration:
Sign in to the Bazaarvoice Portal.
From the upper-right corner, select the settings icon .
Select Ratings & Reviews.
Under Implementations, select Edit next to the implementation you want to configure.
From the menu on the left side of the page, select Web Analytics under Settings.
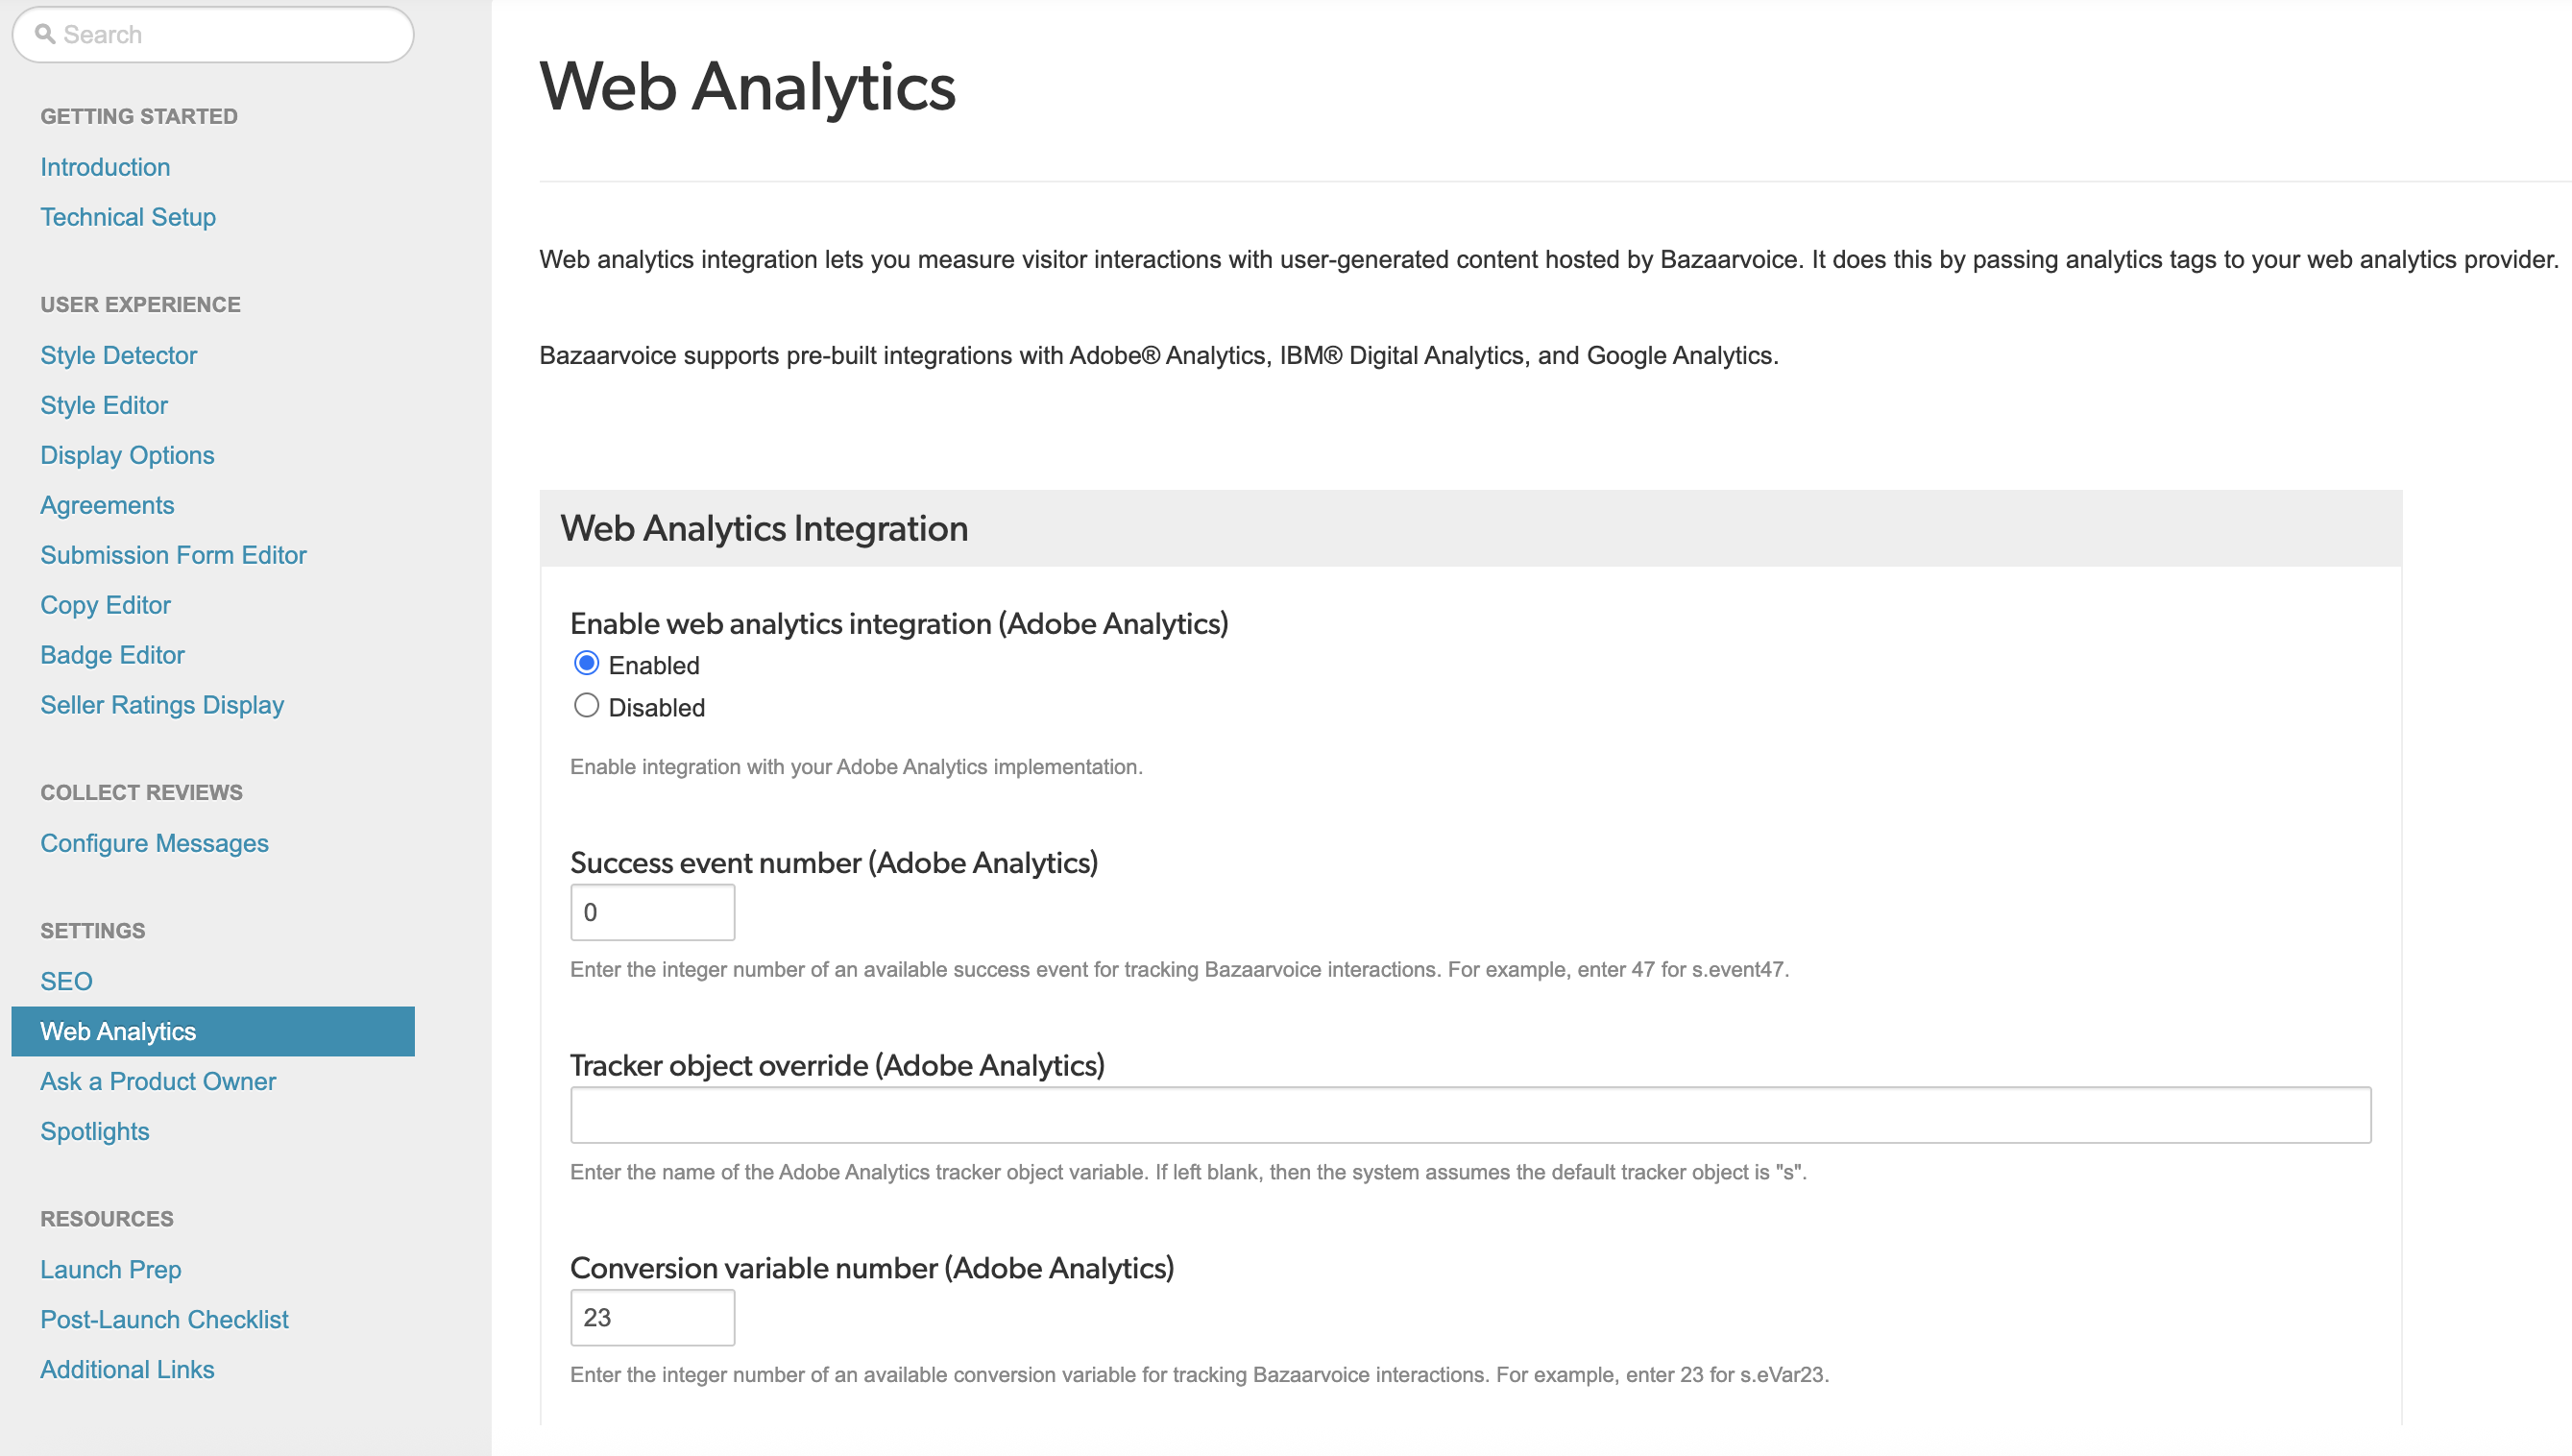
Enable and set up integration with Adobe Analytics, as follows:
Under Enable web analytics integration (Adobe Analytics), select Enabled.
Under Success event number (Adobe Analytics), enter the integer number of an available success event for tracking Bazaarvoice interactions. For example, enter 47 for the s.event47 event.
Under Tracker object override (Adobe Analytics), enter the name of the Adobe Analytics tracker object variable. If you leave this field blank, the system assumes that the default tracker object is "s."
Under Conversion variable number (Adobe Analytics), enter the integer number of an available conversion variable for tracking Bazaarvoice interactions. For example, enter 23 for the s.eVar23 variable.
Important:Enter the exact value of the eVar configured in your Adobe Analytics account.
For existing Vibe clients: Ensure you use a different eVar for the Ratings & Reviews setup than the one you configured for Vibe. Using the same eVar for both Vibe and Ratings & Reviews results in data overwriting and loss
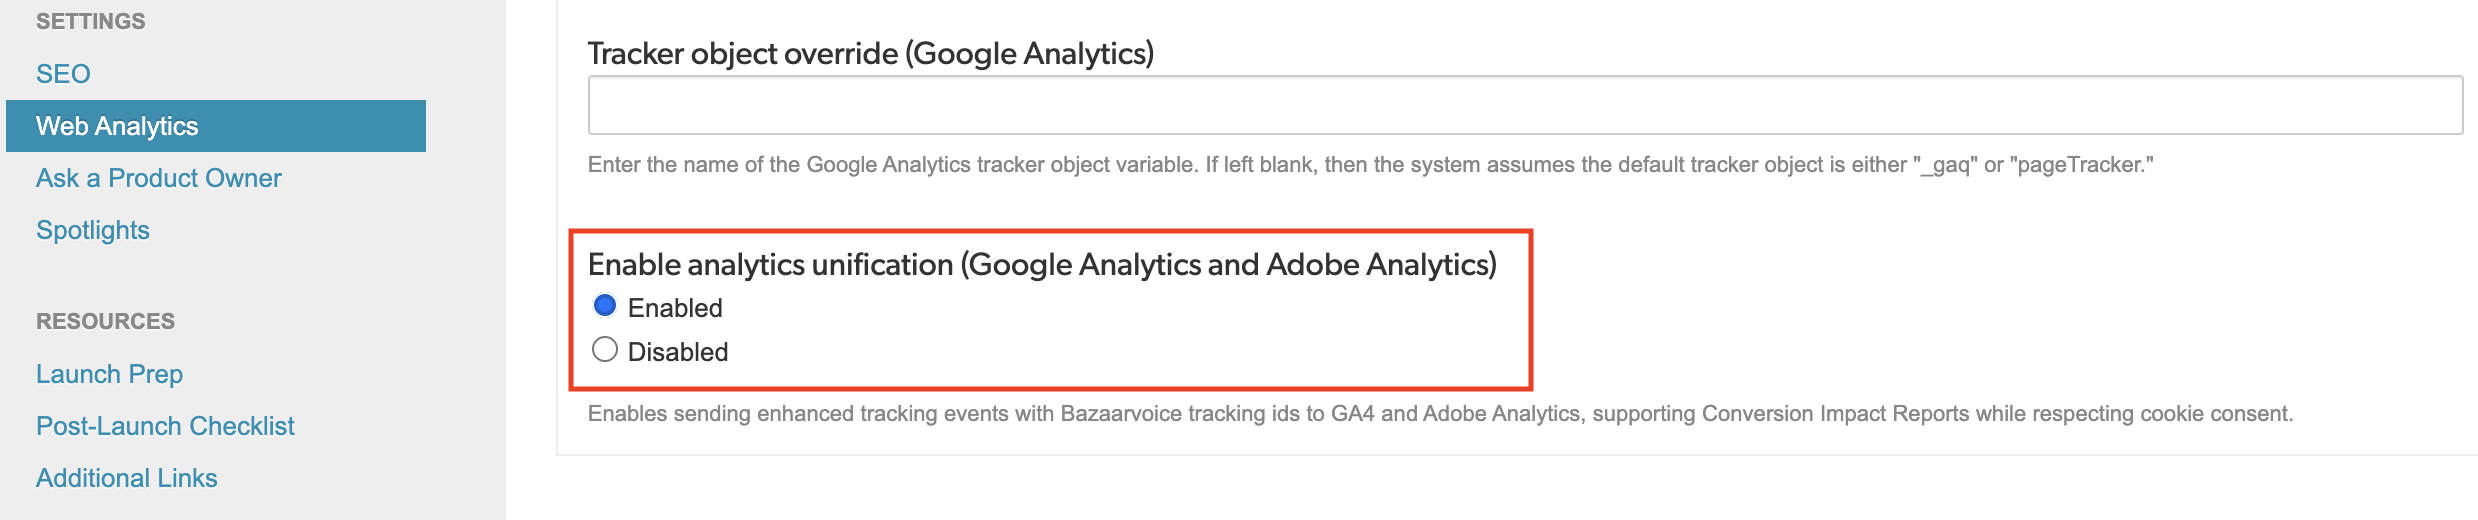
Under Enable analytics unification (Google Analytics and Adobe Analytics), select Enabled.
Deploy the changes to the implementation.
Additional configuration
- Allow first-party cookies: Enable first-party cookies for your website domain in the Workbench client record editor. If you do not consent to this, `loadid` will be the only identifier sent to your analytics setup.
- Configure cookie consent: Integrate a cookie consent mechanism for BVBRANDID and BVBRANDSID cookies. Refer to Bazaarvoice cookie consent for detailed information.
Step 3: Connect Adobe Analytics to Bazaarvoice Portal
Follow these steps to connect the credential that you created in "Step 1: Create developer project and credential" to Portal:
- Go to the Bazaarvoice Portal.
- Select the gear symbol in the top-right corner.
- Go to the Configuration section and select Analytics Providers.
-
Select the Connect button within the Adobe Analytics tile to open the Adobe Analytics page.
Note: Only one analytics account can be connected. Disconnect the existing Google Analytics or Adobe Analytics account to continue. - Open a new tab in your browser and navigate to the Adobe Developer Console.
- Select the Projects tab at the top of the page.
- Select the project you created in the Create developer project and credentials step entitled Bazaarvoice Ratings & Reviews Connection.
- Select the OAuth Server-to-Server credential under Credentials in the left-hand navigation.
- Copy your Client ID from the Adobe Developer Console and paste it into the Adobe Client ID text field in the Portal. Repeat this process for each text field in the Adobe Analytics page by copying the information from the Adobe Developer Console and pasting it into the corresponding text field in Ratings & Reviews (for example, Organization ID > Adobe Company ID (Organization ID)).
-
Copy the exact Conversion Variable (eVar) value from your Adobe Analytics account and paste it into the Conversion Variable number (eVar) text field. This variable routes data to your Adobe Analytics setup. If your instance has multiple implementations, select the eVar from the implementation you want to connect to Adobe Analytics.
Important:
For existing Vibe clients: Ensure you use a different eVar for the Ratings & Reviews setup than the one you configured for Vibe. Using the same eVar for both Vibe and Ratings & Reviews results in data overwriting and loss - Select Save.
To configure your Adobe Experience Platform (_Satellite), formerly Adobe Launch, follow the steps on this page.
Step 4: Configure Adobe Experience Platform
Before setting up Adobe Analytics, make sure you have connected your Bazaarvoice Portal and Adobe Analytics accounts.
Setting up Adobe Analytics
To set up Adobe Analytics with the Bazaarvoice Portal, confirm that:
- The Report Suite ID matches between Adobe Experience Platform and the Portal.
- The same eVar is used in Adobe Experience Platform, the Portal, and the Ratings & Reviews configuration.
Create a rule
To create a rule within your existing site’s tag property of Adobe Experience Platform, follow these steps:
-
Under Property, navigate to the Rules sidebar tab.
- Select Add Rule in the upper right corner.
-
Enter a name to identify the Ratings & Reviews rule within your property, we recommend “R\&R Experience.”
Add an event
- Create a new event by selecting the Add button under Events.
- Select the drop-down on the left for Event Type and select Direct Call.
- In the Name field, enter "bv_rr - direct call" to identify this event configuration.
- In the Identifier field, enter "bv_rr".
- Select Keep Changes to save.
Add and set up an action
- Select the Add button under Actions.
- Change the extension type to Adobe Analytics in the drop-down on the left.
- Change the action type to Set Variables in the drop-down down on the left.
- Set the name to "Ratings & Reviews".
-
Set the variables using the eVar you configured in the Setting up Adobe Analytics section. Select this eVar from the eVars drop-down list.
Note: Use the same eVar configured in the Portal for the Ratings & Reviews configuration. - Select Set as from the middle drop-down.
- In the third drop-down, enter "%event.detail.requestId%".
- Select Keep Changes.
Create another action
- Select the + button next to the previously created action.
- Under Extension, select Adobe Analytics.
- Change Action Type to Send Beacon.
- In the Name field, enter "Ratings & Reviews - Send Beacon".
- Under Tracking, select s.tl().
- From the Link Type drop-down, select Custom Link.
- In the Link Name field, set the value as "%event.detail.requestId".
-
Select Keep Changes to save.
- Select Save.