Content Responder Content Administrator
Brands that actively respond to customer questions see an average 98% lift in conversion compared to those that don't. To help your team deliver fast, accurate answers at scale, we offer three response options:
- Custom answers: Type unique answers directly into the text field.
- AI Answer Assistant: Automatically drafts answers using your product descriptions, customer reviews, PDP context, and historical Q&A data.
- Saved answer templates: Insert reusable template answers for common queries. Such as delivery enquiries, warranties, or standard product specs.

Answer Assistant guides
Watch this short video for an overview of Answer Assistant:
Before you begin
Already set up? Go straight to How to answer a question.
To answer questions, make sure your Account Administrator has set up the following:
A Contributor ID
Account Administrator
Step 1: Create a contributor ID profile (Contributors app)
-
Sign in to the Bazaarvoice Portal

-
From the top navigation bar, select Ratings & Reviews.
-
From the sidebar, select Contributors.
-
Select +Add contributors, enter the details, and select Save.
Learn more about creating contributor IDs and ID naming guidelines.
Account Administrator
Step 2: Link contributor ID to user profile account (Manage Users app)
-
Sign in to the Bazaarvoice Portal
-
Select the settings icon
 in the upper-right corner.
- Select Manage Users.
- Use the Filters or Search bar to find a user.
- Select the relevant user from the Name column of the users table. The Edit user page appears.
-
Under Solutions, select Questions & Answers. This activates the Manage Contributors section below.
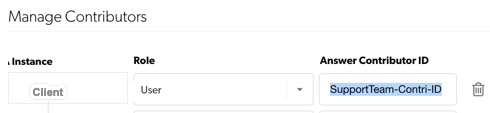
- Under Manage Contributors, find your instance and enter the Answer Contributor ID created in Step 1. Ignore the Role drop-down, it's not relevant.
- Select Save.
Content Responder role
Assign the 'Content Responder' role in Manage Users
Users will not be able to reply to Q&A threads unless both the Contributor ID and Content Responder role is assigned to the user profile
-
Sign in to the Bazaarvoice Portal
-
From the upper-right corner, select the settings icon
 .
.
- Select Manage Users. The Users tab opens.
- Find the user and ensure the Content Responder role is assigned.
- Select Save.
Enable Answer Assistant

- Contributor ID:
-
This is a system ID needed for authentication purposes (example,
Marketing=0006_ID). - Creating a Contributor ID does not automatically create a public display name.
- You will be prompted to add a public display name the first time time you submit an answer.
-
This is a system ID needed for authentication purposes (example,
- Display name: This is a name (example,
Customer Care) that consumers see on your website. It's tied to a contributor profile rather than an individual portal user account.
Enable Answer Assistant
Account Administrator Configuration Administrator
To enable and deploy Answer Assistant:
-
Sign in to the Bazaarvoice Portal

- From the upper-right corner, select the settings icon.
- Under Configuration, select Ratings & Reviews. The Site Manager lists all your active deployment zones and implementations.
- Under Implementations, select Edit next to the implementation you want to configure.
- Under User Experience, select Display Options.
-
Select the Questions & Answers tab.

- Navigate to the Answer Submission section.
- Under Answer Assistant, select Enabled.
-
Select the Home icon
 to return to the Implementations home page.
- Redeploy your display configuration to activate Answer Assistant in Questions & Answers.
-
To make sure Answer Assistant is activated in Portal:
- Navigate to the Bazaarvoice Portal.
- From the top navigation bar, select Ratings & Reviews.
- From the side bar, select Questions, then locate a question.
- Look for the ✨ AI answer available label above the text box.
- Click into the answer box.
- Select the AI sparkle icon below the text box to populate the AI-generated answer.
Watch this video on how to enable and deploy Answer Assistant:
Answer using AI Answer Assistant
Answer Assistant generates factually grounded response drafts in seconds. Every draft requires manual approval, so you stay in control.
To answer a question using Answer Assistant:
-
Sign in to the Bazaarvoice Portal
- From the navigation bar, select Ratings & Reviews.
- Select Questions.
- Use filters or the search bar to find the question you want to address.
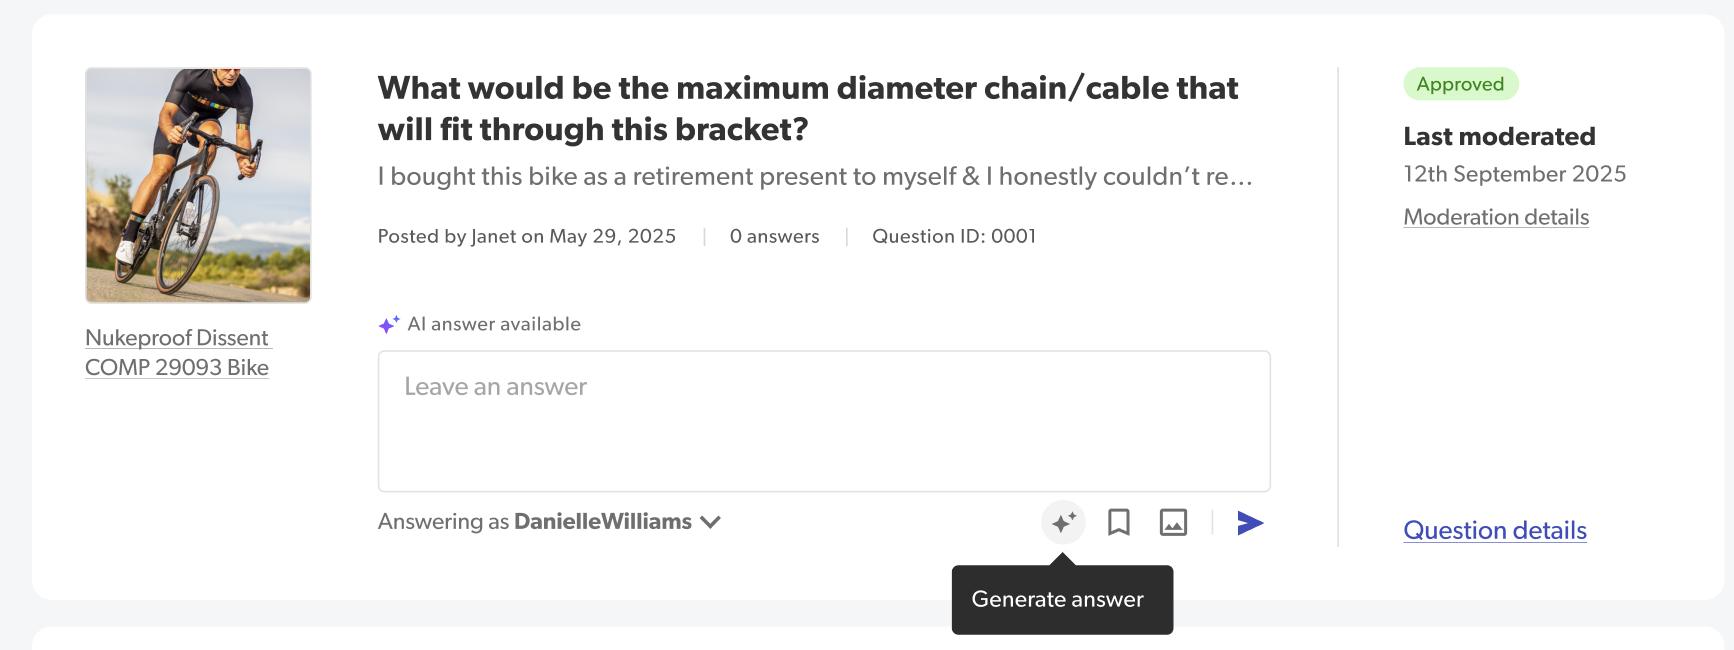
- Look for the ✨ AI answer available label above the answer field to confirm a draft is ready.
-
Select the Leave an answer text field, then select the Generate answer sparkle icon under the text field to populate the AI draft.
-
Review the generated draft and choose to:
- Accept: Keep the AI draft as written.
- Modify: Edit or personalize the AI answer.
- Delete: Clear the generated text to write your own answer.
-
(Optional) If you have multiple display names set up, select the Answering as drop-down list to switch to a different name.
Note: If this is your first time answering, you will be prompted to add contributor details first.
- (Optional) If media upload is enabled in your configuration settings, select the Add media icon to upload photos or paste a YouTube video link, then select Add.
- Select Submit.
Add contributor details
When answering your first question, you will be prompted to enter a public display name. You can use an individual name or a generic group name such as, Support Team to represent your team on your website.
To create or edit a display name:
- Use filters or the search bar to find the question you want to address.
- Enter an answer into the answer text field.
- If this is your first time answering a question, the Contributor details modal will appear.
- Enter a display name, for example, ‘Support Team’. Refer to guidelines.
- (Optional) Enter a location to provide geographic context for public answers. Location is optional unless set to mandatory in your Configuration settings.
-
Select Submit.
Keep in mind that display names belong to the contributor profile, not an individual Portal user account.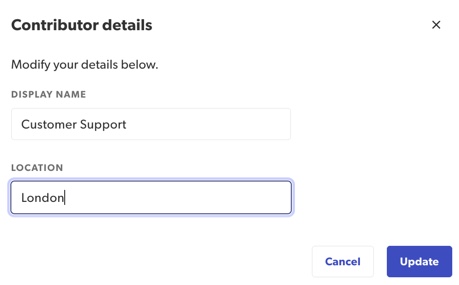
To edit an existing display name, select the name next to the Answering as link.
Display name guidelines
- Allowed characters: You can use letters (A-Z, a-z), numbers (0-9)
- Forbidden characters: You cannot use the following special characters:
@,!,-,.,(,),*,&,$,=,;,:,+,? - Length: Must be between 1 and 255 characters long.
Answer with a saved template
Content Responder Content Administrator
To answer a question using a saved answer template:
- Sign in to the Bazaarvoice Portal
- From the top navigation bar, select Ratings & Reviews.
- From the side bar, select Questions.
- Use filters or the search bar to find the question you want to address.
- Select the Leave an answer text field.
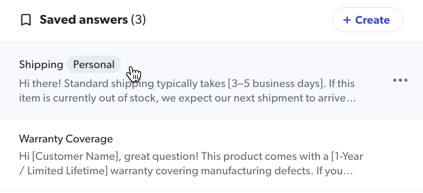
- Select the Saved answers bookmark icon under the text field to open your template list.
Note: If you haven't created any answer templates yet, see Create a saved answer template. - Choose the saved answer you want to insert.
- Personalize your answer as needed.
- (Optional) If you have multiple display names set up, select the Answering as drop-down list to switch to a different name.Note: If this is your first time answering, you will be prompted to add contributor details first.
- (Optional) If media upload is enabled in your configuration settings, select the Add media icon to upload photos or paste a YouTube video link. Then select Add.
- Select Submit.
Tips for using saved answer templates
- Locate templates fast: A search bar automatically appears at the top of your list once you have 8 or more saved answers.
- Understand list sorting: New templates stay at the top during your active session. Refreshing the page reorganizes your list with Favorites first, followed by Most recent.
- Identify personal templates: Look for the Personal badge to easily spot your personal use templates.
Manage your saved answer templates
Keep your saved answer library organized and up to date by editing, favoriting, or deleting your saved answers.
Create a saved answer template
Content Responder Content Administrator
To create a saved answer:
- Select the Leave an answer text field under any question.
- Select the Saved answers bookmark icon in the bottom-right corner of the text field. The Saved answers list appears.
- Select + Create. The Create saved answers modal appears.
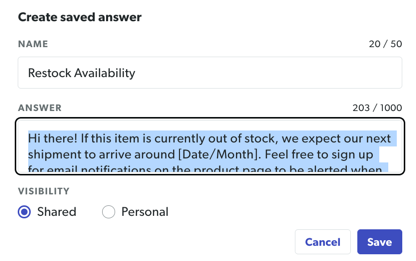
- In the Name field, enter a unique template title of up to 50 characters.
- In the Answer field, enter your template response text.
- Under Visibility, select:
- Personal: Visible and usable only by you.
- Shared (default): Available to all users across your organization.
- Select Save.
Favorite a saved answer template
Favorite your most-used answers to pin them to the top of the Saved answers list:
- Select the Saved answers bookmark icon below the Leave an answer text field.
- In the Saved answers list, hover over the answer you want to favorite, and select the ellipsis icon (...).
- Select Favorite.
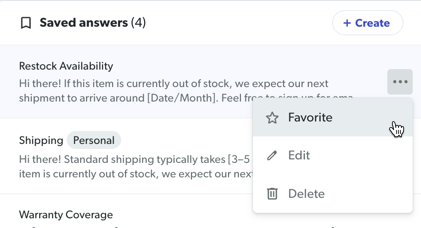
A star appears next to the answer template name, moving it to the top of your list.
Edit a saved answer template
To edit an answer template:
- Select the Saved answers bookmark icon below the Leave an answer text field.
- Hover over the answer template you want to edit, and then select the ellipsis icon (...).
- Select Edit. The Edit saved answers modal appears.
- Update the Name, Answer, or Visibility setting.
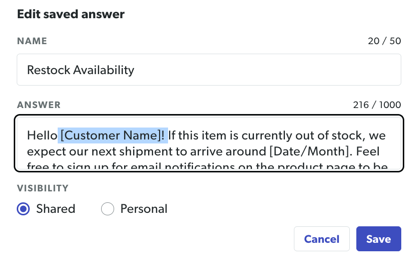
- Select Save.
Delete a saved answer template
Deleting a saved answer template does not affect any question responses you have already published using it.
To delete an answer template:
- Select the Saved answers bookmark icon below the Leave an answer text field.
- Hover over the saved answer template you want to delete, then select the ellipsis icon (...).
- Select Delete.
AI labeling, responsibility, and compliance
Once published, Answer Assistant responses are clearly labeled as either 'AI-generated, Human-approved' or 'AI-assisted, Human-approved' on your live product pages (PDPs).
Disclaimer: Using AI-generated answers
Bazaarvoice’s Answer Assistant uses generative AI to draft initial responses to consumer questions. However, as the client, you are fully responsible for all content you post, including all answers published and displayed on your Product Details Pages (PDPs). Therefore, your team must review, edit, and approve every AI-generated draft to ensure accuracy and brand alignment before publishing it to your live website.