Contributor badges spotlight credible users who consistently share helpful or detailed product reviews. They provide a visual badge of trust and authority. By identifying contributors as verified staff or industry experts, you help consumers distinguish professional insights from general feedback.
1. Understand contributor badges
Content Administrator Account Administrator

You can assign one or more of the following:
| Badge type | Badge label | Description |
|---|---|---|
| Staff (Affiliation) |  |
This contributor is a verified employee of your company.
|
| Expert (Rank) |  |
This contributor is recognized as a product or industry expert.
|
| Merit eligibility |  |
You can either enable or disable merit badge eligibility. If enabled, it's calculated and updated daily by the system. Awarded to contributors whose reviews consistently receive a high number of helpfulness votes and who submit reviews regularly. |
Learn how to enable badges.
2. How to find contributors
Quick search
Use the search bar in the Contributors page to find contributor users by:
Expert). This search is not case-sensitive.
4239, 3098, Expert).

Use filters
To narrow your search when looking for contributors:
- Select Filters. The Contributors filter panel appears.
- Select either Badges or Moderation status.
- Select one or more checkboxes for your filter criteria.
- Select Apply and close.
|
Filter by
|
Description
|
|---|---|
|
Badges
|
Filter by Staff, Expert, or Merit eligibility badge, or select No badges. |
|
Moderaton status
|
Select one or more contributor statuses: Approved, Rejected, or Pending. |
3. How to update answer contributor details
Content Administrator Account Administrator
To manage settings like Moderation status, Badges, or Hyperlink permissions:
-
Sign in to Bazaarvoice Portal
 .
.
- From the top navigation bar, select Ratings & Reviews.
- From the side bar, select Contributors. The Contributors page appears.
-
Filter your list to find a specific contributor and update their specific details.
Contributor details
Use the table below to understand the fields available on the Contributors page.
Column name Description Contributor ID A unique identifier (UID) needed for authentication. Select the Contributor ID hyperlink to view or edit specific details.
If you're using hosted display authentication, you must create your own contributor IDs. Bazaarvoice doesn’t generate them automatically.If you're using site authentication, we recommend entering a valid, pre-existing ID from your own database.
Display name The public-facing name ("Sarah - Customer Support"). Display name can represent an individual, team, or role and is visible to consumers who read the content.
Do not use PII or email addresses for display names. Whether using an individual or team name, always include a badge to establish trust and verify the contributor’s affiliation.
New contributors will be prompted to create a display name when they submit their first answer. Display names are not created using the Contributors application.Badges Displays assigned badges like Staff or Expert. They’re displayed next to the display name on published reviews or answers. Hyperlinks Indicates if the contributor can include links in their responses. Some contributors use hyperlinks to direct customers to helpful resources like product guides or support articles. Status Contributor's moderation status:
- Awaiting: A new profile that has not yet submitted content. Profiles only become eligible for moderation after their first submission.
- Pending: Content has been submitted and is currently under review by the Bazaarvoice moderation team.
- Approved: The contributor is authorized to respond to reviews, questions, and comments.
- Rejected: Access has been denied by a Content or Account Administrator.
Once a contributor profile is approved, subsequent users assigned to it do not need to go through the approval process. This is a one-time only task.
- Contributor ID: This is the system ID needed for authentication purposes (example.,
Marketing=0006_ID). You can search for contributor ID in the Contributors application. - Display name: This is the public name (example,
Customer Care) consumers see on your website. Learn how to create a display name.
a. Update individual contributor details
Content Administrator Account Administrator
To modify a single contributor's details:
- From the top navigation bar, select Ratings & Reviews.
- From the side bar, select Contributors. The Contributors page appears.
- Search for the specific contributor you need to edit.
-
Select one of the following options to update their profile:
- Option A:
- Select the Contributor ID hyperlink. The Edit details page appears.
- Update the moderation status, assign or unassign badges, and enable or disable hyperlinks as needed.
- Select Save changes.
- Option B:
-
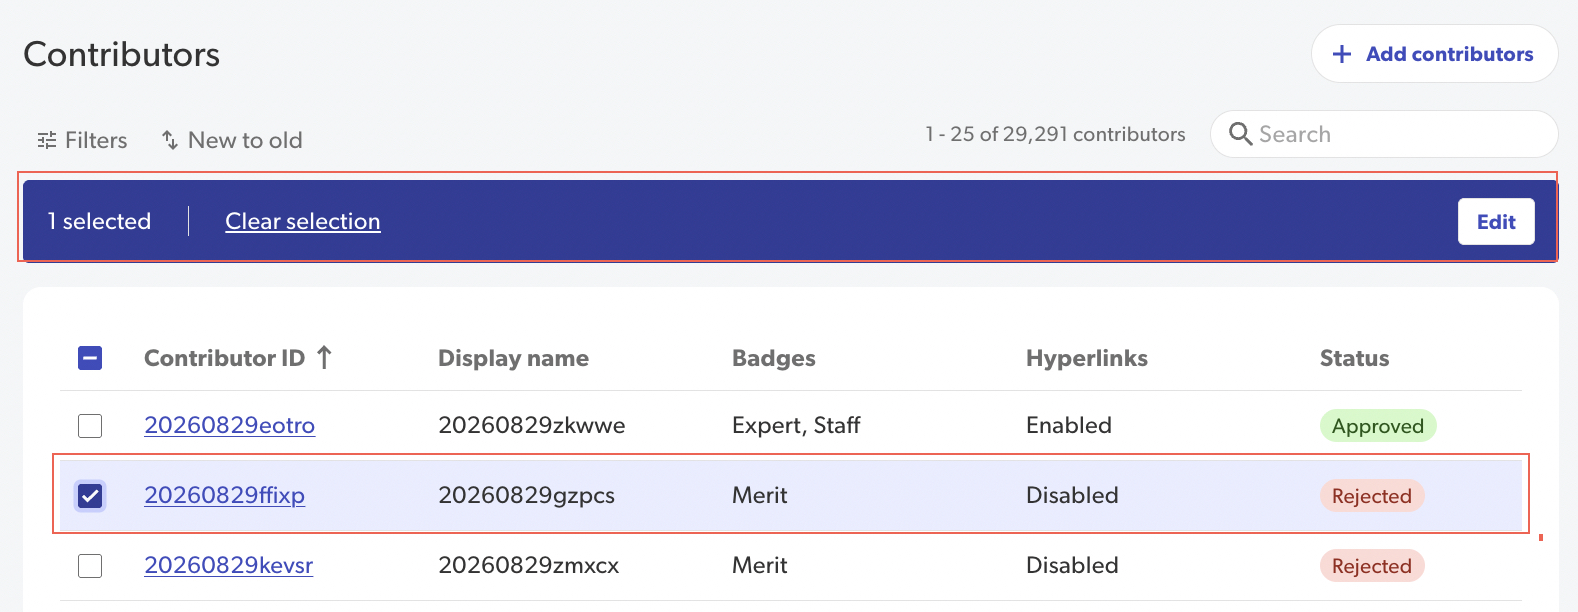
Select the checkbox next to the Contributor ID hyperlink. The Edit panel appears.
-
Select Edit. The Edit details page appears.
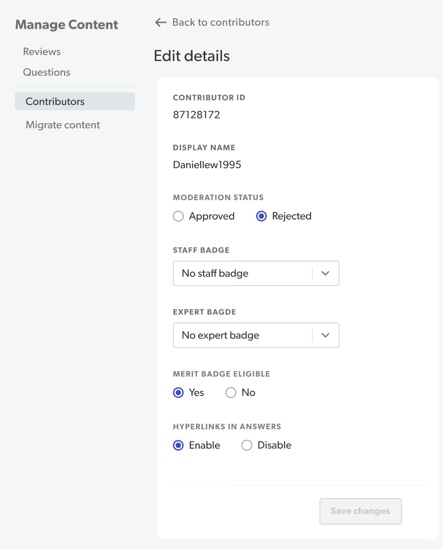
- Update the moderation status, assign or unassign badges, and enable or disable hyperlinks as needed.
- Select Save changes.
-
Select the checkbox next to the Contributor ID hyperlink. The Edit panel appears.
- Option A:
b. Bulk update multiple contributors

Content Administrator Account Administrator
To update multiple contributors simultaneously:
- From the top navigation bar, select Ratings & Reviews.
- From the side bar, select Contributors.
- Find your list of contributors.
-
Select one of the following bulk update options:
-
To update two or more contributors:
-
Select the checkboxes next to each Contributor ID hyperlink. The bulk update panel appears.
-
Select Edit on the bulk update panel. The Edit details page appears.
- Update the moderation status, assign or unassign badges, or enable or disable hyperlinks as needed.
-
Select Save changes. .
-
-
To update all 25 contributors on a page at once:
-
Select the checkbox in the table header in the upper-left corner, beside the Contributor ID column name. The bulk update panel appears.
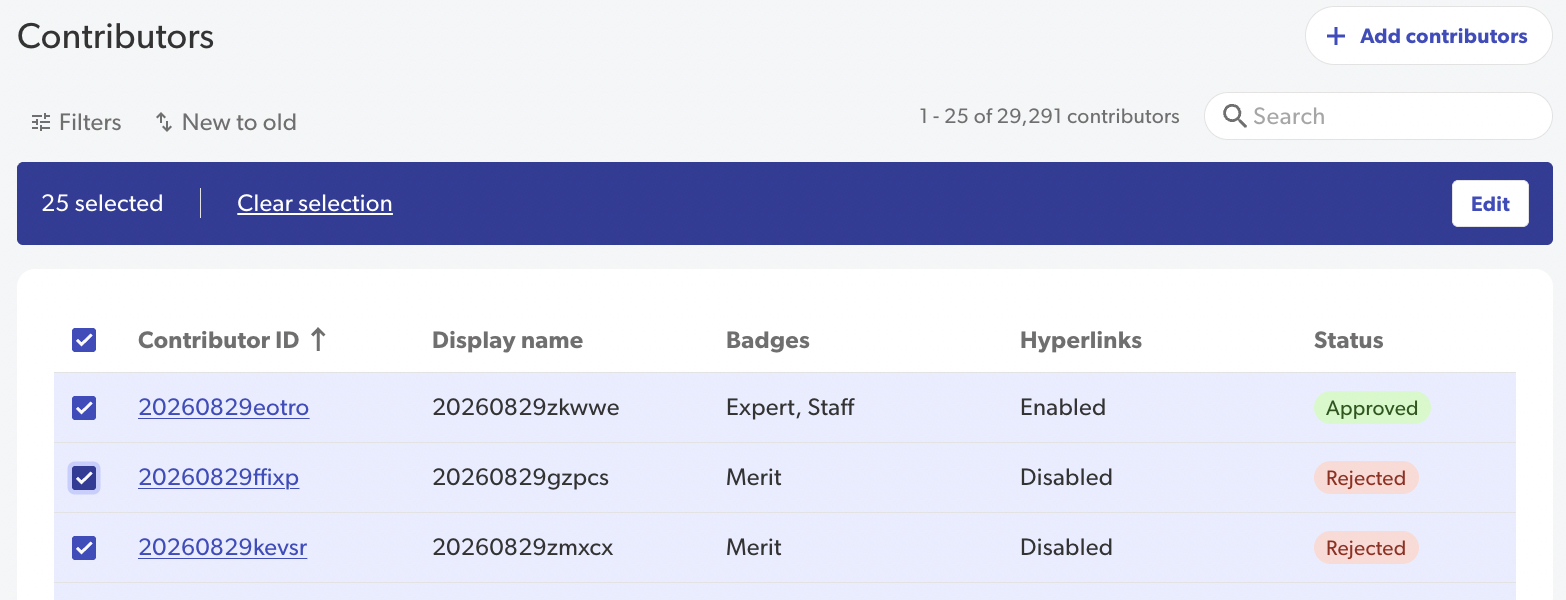
- Select Edit on the bulk update panel. The Edit details page appears.
- Update the moderation status, assign or unassign badges, or enable or disable hyperlinks as needed.
-
Select Save changes.
-
Select the checkbox in the table header in the upper-left corner, beside the Contributor ID column name. The bulk update panel appears.
-
4. How to moderate multiple contributors
Content Administrator Account Administrator
Bazaarvoice enforces a two-step process to maintain authenticity and control over who responds to your reviews:
- Initial submission: A new contributor profile only enters the system once that contributor profile submits their first piece of content.
- One-time approval: The Bazaarvoice moderation team reviews the contributor profile. Once approved, all subsequent content from that ID is automatically authorized.
Important: When moderating in bulk, existing statuses and badge assignments will not pre-load. Any changes made will overwrite current settings for all selected contributors.
To bulk moderate several contributors:
-
Sign in to the Bazaarvoice Portal.
- From the top navigation bar, select Ratings & Reviews.
- From the side bar, select Contributors.
- Filter your list of contributors or use the search bar to find the contributors you want to moderate.
-
Select one of the following options:
-
To moderate two or more contributors:
- Select the checkboxes next to each Contributor ID hyperlink. The Edit panel appears.
-
Select Edit on the Edit panel. The Edit details page appears.
- Under Moderation status, select either Approve or Reject.
- Select Save changes.
-
To update 25 contributors at once:
- Select the checkbox in the table header in the upper-left corner, beside the Contributor ID column name. The bulk update panel displays.
- Select Edit on the bulk update panel. The Edit details page appears.
- Under Moderation status, select either Approve or Reject.
- Select Save changes.
-
To moderate two or more contributors:
5. How to create a new contributor profile
Content Administrator Account Administrator
To create a new contributor profile, add contributor IDs and assign Staff, Expert, or Merit badges.
- Sign in to the Bazaarvoice Portal.
- From the top navigation bar, select Ratings & Reviews.
- From the side bar, select Contributors.
- Select +Add contributors in the upper-right corner. The Add contributors page appears.
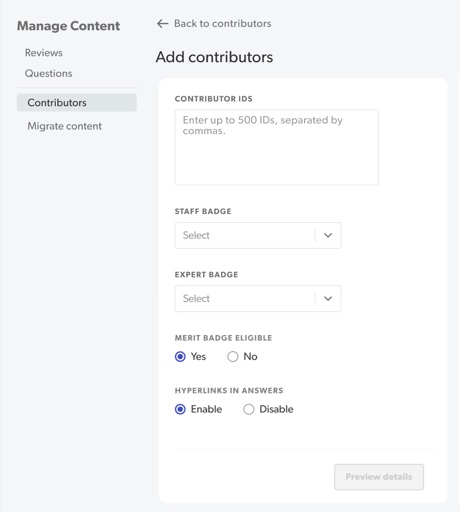
- Enter one or more contributor IDs. You can add up to 5,000 IDs (comma-separate).
-
Configure the contributor settings as needed:
- Staff Badge: Select the staff badge from the Staff badge drop-down list.
- Expert Badge: Select the expert badge from the Expert badge drop-down list.
- Merit Badge Eligibility: Toggle the eligibility setting (Yes is selected by default).
- Hyperlinks in Answers Eligibility. Toggle this setting (Enable is selected by default).
- Select Preview details to review your entries. Select Back to return to the previous screen and make any additional edits.
- Select Submit. New contributors may take up to 15 minutes to appear in the system.
Contributor ID guidelines
Use the following requirements to ensure your contributor IDs are compatible within the system and easy to manage long-term.
|
Contributor ID
|
Requirement
|
|---|---|
|
Length
|
Can be up to 255 characters.
|
|
Characters
|
Alphanumeric (a-z, A-Z, 0-9) and safe symbols: ! , - , _, . , ( , ) , * , & , $ , = , ; , : , + , ? |
|
Restricted
|
Do not use spaces or the these restricted symbols: #,@ |
|
Best practice
|
Avoid using email addresses. |
A contributor ID can be assigned to multiple users. For example, if Maggie Smith and James Lee are staff members on your support team, you can assign the same contributor ID to both users. Any specific badges such as Staff, Expert, or Merit linked to a contributor ID will automatically appear on your live site. Refer to Linking a contributor ID to user for more details.
Examples:
-
✅ Valid:
User-1234*100,Staff_&0006,Marketing=0006 -
❌ Invalid:
User 123(space),Expert@#(restricted symbols)
Troubleshooting
- System sync: New contributors may take up to 15 minutes to appear in the Portal.
- Moderation trigger: A new profile only becomes eligible for moderation once the first user linked to that contributor profile submits their first piece of content.
- Badge display enablement: Assigning a badge in the Portal does not automatically display it on your site. You must Enable badges display within your site configuration settings. This is a one-time setup task.
Why is this a "One-time" setup task?
Badge labels will not appear on your live site until the Enable badge display setting is turned on. Once enabled in your Configuration settings, this remains active for your entire company instance, you do not need to repeat this step for newly added contributor IDs.
6. How to link an answer contributor ID using Config
Content Administrator Account Administrator
A Contributor ID authenticates users who answer consumer questions.
- You can assign a single ID (such as a shared "Customer-Support-ID") across your entire team.
- Once linked, any associated badges (Staff, Expert, or Merit) automatically display on your live site.
Before you begin
Locate an existing contributor ID (example, ContID13457 or Support-Team-Contri_ID) using the search bar, or
-
Sign in to Bazaarvoice Portal.
-
Select the settings icon
 in the upper-right corner.
- Select Manage Users.
- Use the Search bar to find a user.
- The Edit user page appears.
-
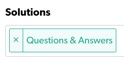
Under Solutions, select Questions & Answers .
-
Once Questions & Answers is selected, a section labelled Manage Contributors becomes active.
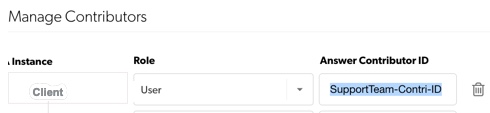
- For each instance, enter the Answer Contributor ID. Ignore the Role drop-down, it's not relevant.
- (Optional) To delete an Answer Contributor ID for a specific client instance, use the trash can icon.
-
Select Save.