You can manually request the rights to user-generated content (UGC) individually anytime or in bulk when distributing to Galleries. Manage your rights requests from the Rights Request page in Settings. If you haven't set up rights requesting, read our rights requesting setup topic.
After requesting rights, the post status will change to Rights Pending. It can take up to three hours after source respond for the status to change to Rights Approved.
Where to start
You can request rights anywhere that you can view and select UGC.

To start requesting rights via direct message or comments, you need to enable certain permissions. Follow the steps below for your chosen social media account.
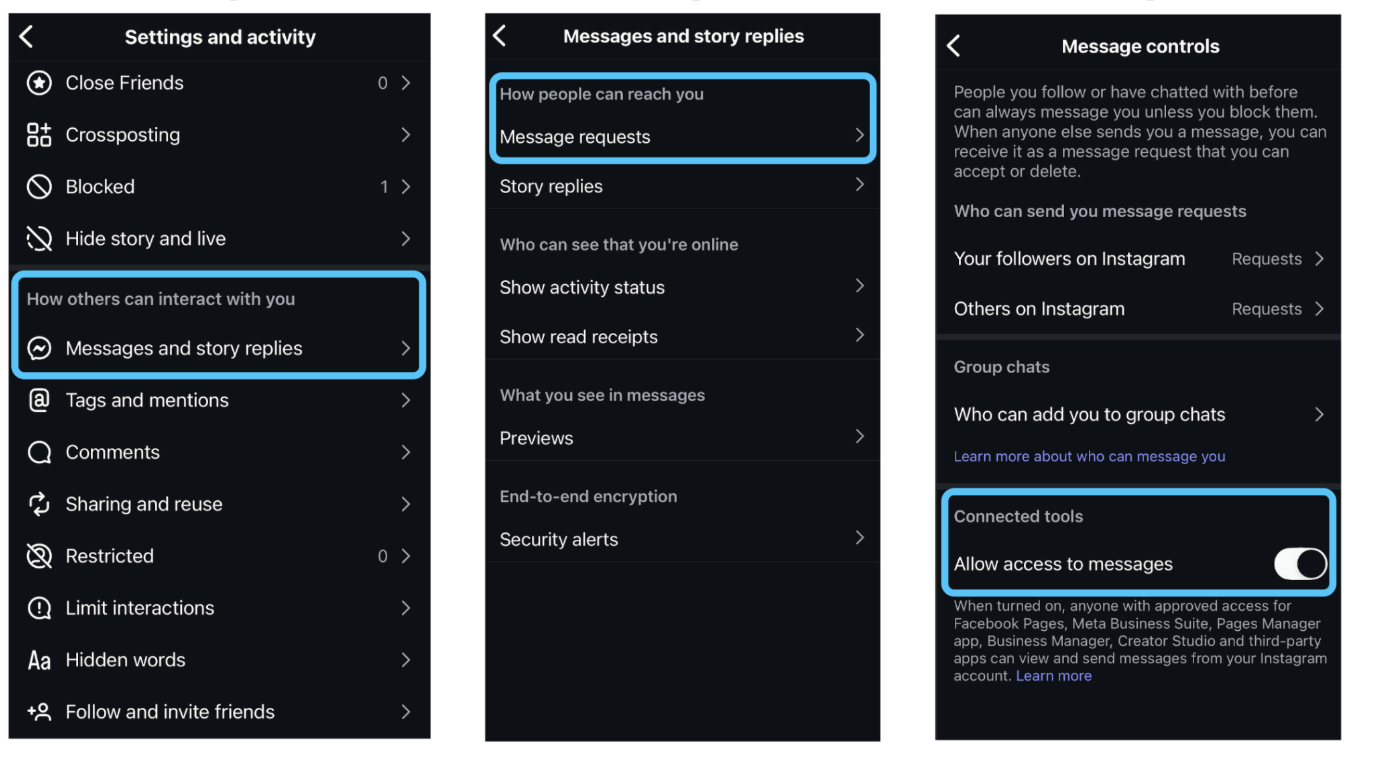
To request rights by messaging an account who posted UGC where your account was mentioned in the post caption, you firstly need to enable message access.
To start receiving and sending direct messages, follow these steps:
-
Open the Instagram app and go to your profile.
-
Select the menu (☰) icon in the top-right corner to open settings and activity.
-
Navigate to How others can interact with you.
-
Navigate to Messages and story replies and then Message requests.
-
Navigate to Connected Tools, and then select the toggle to switch on Allow Access to Messages.
- Refresh your Instagram account in Vibe by navigating to Settings > Social Media Accounts, and then selecting Refresh.

TikTok
To request the rights to UGC posted on TikTok, you must first enable certain permissions. To enable these permissions, complete the following steps:
-
In Vibe, select the gear icon in the top-right corner to open the Settings page.
-
Make sure you're on the Social Media Accounts tab.
-
Navigate to the TikTok section.
-
The permissions Brand Insights and View Comments permissions must be enabled. If either of these appear under the Missing Permissions heading, select the Disconnect button. Then, select the Connect button to reconnect your account and update your permissions.
Individual in-app rights requests
Follow these steps to manually request the rights to individual UGC where your account was mentioned in the post caption:- Choose the UGC that you want to request the rights and select the image or video thumbnail. The Universal Image Actions (UIA) page will open.
- Select Request Rights.
- Choose either the Request in Comments or Request in Direct Message tab.
- Select the drop-down menu labeled Choose a message to use: to choose a messaging campaign.
- If you want to use a different message from the selected campaign, select Use a different message below the message preview.
- Select Request.

Individual copy and paste rights requests
This section describes the steps you should take to manually request the rights to individual UGC where your account was tagged in the post, mentioned in the post comments, or you tracked a hashtag that this post includes. You can do this via two different methods — by commenting on the UGC or by sending the user who posted the UGC a direct message.
Requesting Rights via Comments
You can request rights to UGC on Instagram and TikTok whenever a creator mentions your account in a post caption. On Instagram, you can also request rights for content sourced from specific hashtags or creators that you're actively tracking. To request rights by commenting on individual UGC , follow these steps:
- Choose the UGC that you want to request the rights and select the image or video thumbnail. The Universal Image Actions (UIA) page will open.
- Select Request Rights.
- Select the Request via Comments tab.
- Select the drop-down menu labeled Choose a message to use: to choose a messaging campaign.
- If you want to use a different message from the selected campaign, select Use a different message below the message preview.
- Select Copy and Paste in Instagram or Copy and Paste in TikTok. We will copy the message to your clipboard and open the post on Instagram's website in a new window.
- Paste the copied message into the comments of the post and select Post.
Requesting Rights via direct message
Rights requests via direct message (DM) are available for content where the owner's username is identified, specifically mentioned and tagged content, or tracked creators. Hashtagged content is generally excluded from DM requests unless the brand is mentioned within the comments of that post.
To start requesting rights via direct message, follow these steps:
- Choose the UGC that you want to request the rights and select the image or video thumbnail. The Universal Image Actions (UIA) page will open
- Select Request Rights.
- Select the Request via Direct Message tab.
- Select the drop-down menu labeled Choose a message to use: to choose a messaging campaign.
- If you want to use a different message from the selected campaign, select Use a different message below the message preview.
- Select Copy and Paste in Instagram. We will copy the message to your clipboard and open a message to the user on Instagram's website in a new window.
- Paste the copied message into the message to the user and select Send.
Bulk in-app rights requests for Galleries
Follow these steps to automatically request the rights to multiple UGC where your account was mentioned in the post captions:- Choose the UGC that you want to request the rights to and hover over the image or video thumbnail. A checkmark icon will appear.
- Select the checkmark icon on all UGC that you want to request the rights to. A banner will appear at the top of the page.
- Select Add on the right side of the banner. A drop-down menu will appear. If you've already distributed to Galleries, select Request Rights instead of Add and skip to step 7.
- Select Add to Gallery from the drop-down menu. The Add to Galleries page will appear.
- Select the checkbox next to each Gallery name that you want to distribute the UGC to.
- Select Add to Galleries.
- A rights request message will be sent automatically.
- Select Request Rights for # Items. To cancel and request the rights later, select Request Rights Later for # Items.
We will not publish UGC until you've received the rights.
Bulk copy and paste rights requests for Galleries
Follow these steps to manually request the rights to multiple UGC where you account was tagged in the post, mentioned in the post comments, or you tracked a hashtag that this post includes:
- Choose the UGC that you want to request the rights to and hover over the image or video thumbnail. A checkmark icon will appear.
- Select the checkmark icon on all UGC that you want to request the rights to. A banner will appear at the top of the page.
- Select Add on the right side of the banner. A drop-down menu will appear. If you've already distributed to Galleries, select Request Rights instead of Add and skip to step 7.
- Select Add to Gallery from the drop-down menu.
- Select the checkbox next to each Gallery name that you want to distribute the UGC to.
- Select Add to Galleries.
- Select the drop-down menu labeled Messaging Campaign and choose a messaging campaign.
- If you want to use a different message from the selected campaign, select the cycle button in the upper-right corner of the message preview.
- Select Request Rights on Instagram. We will copy the message to your clipboard and open the first post on Instagram's website in a new window.
- Paste and post the copied message in the comments of the post.
- Close the Instagram window.
- In Vibe, select the next post and select Request Rights on Instagram.
- Repeat the process of requesting rights until you have requested the rights to all selected UGC.
- Select Done.
Mark content as approved and set an expiration date
You can mark content that you already have the rights to as "approved." You can also set an expiration date for the content and Vibe will automatically remove it from your displays.
Follow these steps to mark content as approved and set an expiration date:- Choose the UGC that you want to request the rights and select the image or video thumbnail. The Universal Image Actions (UIA) page will open.
- Select Request Rights.
- Select Mark as approved.
- (Optional) Select the drop-down menu under Expiry date (optional). You can mark content as Approved and set an expiration date if you already have the rights for that content. You can also set an expiration date for any pre-approved content, including brand-owned posts, uploads, and auto-approved creators. Vibe will automatically remove this content from your displays upon expiry.
- Select the date you want the rights to this content to expire.
- Select Done.
If you skipped the expiration date, you can come back and add an expiration date at any time by following steps 1-3 again and selecting Add expiry date. You can also edit the expiration date by following the same steps and selecting Edit expiry date.
View and manage rights requests
From the Rights Request tab in Settings, you can view, manage, and sort posts of all rights request statuses.
Where to start
Follow these steps to navigate to the Rights Request tab:- In Vibe, select the gear icon in the top-right corner. The Settings page will open.
- Select the Rights Requests tab.
Rights badges
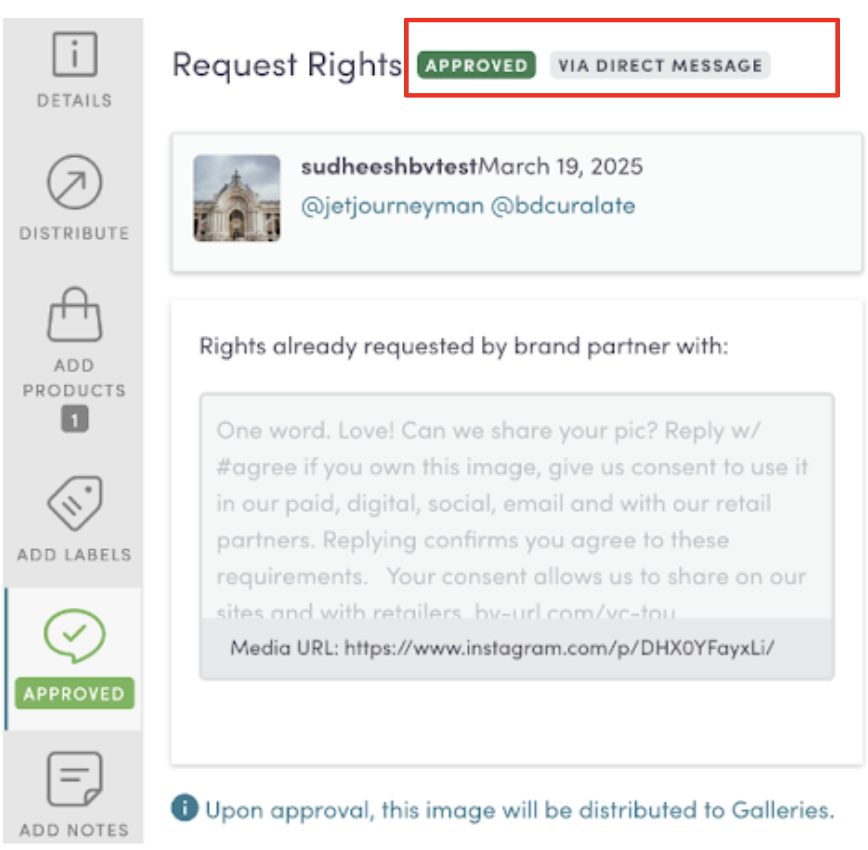
When rights have been approved for a piece of content by your partner brand, you’ll be able to see how these rights were approved (Direct Message, Comments, Sampling campaign, or Social Creator campaign) thanks to a badge. The badge will display the specific method used to request rights alongside the full request message, proving that valid legal terms were presented to and accepted by the user.
Sort and filter rights requests
You can filter and sort your rights requests to find the UGC you're looking for. There are two filtering and sorting options:- Rights request status: Select the first drop-down menu and choose a rights request status. Only posts of the selected rights request status will display.
- Content attribute: Select the second drop-down menu and choose a content attribute. After you select a content attribute, select the Ascending/Descending button to sort the content.
Rights request statuses
There are three rights request statuses:
|
Status
|
Description |
|---|---|
|
Rights Pending
|
After you request the rights to UGC, the post status will change to this status. |
| Rights Approved | If the source approves your rights request within 14 days, the post will change to this status and you will be able to use it across Vibe. |
| Rights Rejected | If the source doesn't respond within 14 days, the post will change to this status. You can extend the rights request period by another 14 days by selecting Extend Rights Request or Request in the Universal Image Actions (UIA) page after the post has changed to this status. |
Content attributes
You can sort rights requests by five content attributes:
|
Attribute
|
Description |
|---|---|
| Requested Date | The date you request the rights to the UGC. |
| Approval Date | The date the source approved your rights request. |
| Posted Date | The date the UGC was posted on Instagram. |
|
Likes
|
The number of likes the post currently has. |
|
Followers
|
The number of followers the source account currently has. |
Manage rights request settings
Read our rights request setup topic to learn how to manage your rights request messaging, terms and conditions, and automatic rights request settings.
Export to CSV
You can export a CSV file that includes information about UGC that you have requested the rights to.
Follow these steps to export to a CSV file:
- Select the download button to the right of the Ascending/Descending button. A CSV file will start downloading in your browser.
- Open the file to view in-depth information about your rights requests.
Exported CSV files will display nine attributes for each rights request:
|
Status
|
Description |
|---|---|
|
Rights Pending
|
After you request the rights to UGC, the post status will change to this status. |
| Rights Approved | If the source approves your rights request within 14 days, the post will change to this status and you will be able to use it across Vibe. |
| Rights Rejected | If the source doesn't respond within 14 days, the post will change to this status. You can extend the rights request period by another 14 days by selecting Extend Rights Request or Request in the Universal Image Actions (UIA) page after the post has changed to this status. |
Content attributes
You can sort rights requests by five content attributes:
|
Attribute
|
Description |
|---|---|
|
Image File
|
The link for the hosted media.
|
|
Network URL
|
The link to the post on Instagram.
|
|
Username
|
The source account's username.
|
|
Comment Date
|
The date and time you requested the rights to the post.
|
|
Comment Text
|
The rights request message you used. |
|
Approval Phrase
|
The hashtag the source needed to send back for the rights to be approved. |
|
Approval Status
|
The rights request status. |
|
Response Date
|
The date and time that the source replied to your request. |
|
Response Text
|
The content of the source's response. |
Common questions
What happens if I request the rights to a carousel post on Instagram?
If the source approves your rights request, you will have the rights to all content in the carousel.
Can I still send customized rights requests manually when automatic rights requesting is enabled?
Yes. Before UGC is distributed, you can request rights manually while automatic rights requesting is enabled. When the content is distributed, a duplicate rights request will not be sent.
Will Vibe request the rights to UGC without my knowledge?
No. We will only send automatic rights request messages after you choose to distribute the UGC.
Will rights requests be sent for UGC that's already been distributed to Galleries or syndicated to the Visual Syndication Network after setting up automatic rights requesting?
No. Only UGC that's distributed to Galleries or syndicated to the Visual Syndication Network after you enable automatic rights requesting will automatic have the rights enabled.
Can I include hyperlinks in a rights request message or comment?
Anchored hyperlinks are not currently supported for Instagram direct messages or comments.